Your centrifugal pump looks like it’s running; the motor’s humming, the gauges are on, but the discharge line is bone dry.
No pressure. No flow. Just wasted energy and a burning motor smell creeping in.
If that sounds familiar, you’re likely facing a priming failure, one of the most common and misunderstood problems in pump systems. The reason for this could range from trapped air to blocked valves, faulty suction lines, or even poor system design.
Centrifugal pumps aren’t self-priming by default. They need a fully filled casing and suction line to create enough vacuum to draw in liquid. Miss a step, ignore a tiny leak, or overestimate the suction lift, and the pump ends up spinning dry or worse, self-destructing.
This article breaks down everything you need to know about centrifugal pump priming, what it is, why it matters, how to get it right (whether manually or with auto systems), and what to watch out for when things go wrong.
Because when priming fails, it’s rarely about just one thing, and the damage rarely stays small.
Key Takeaways
- Priming isn’t just a switch you flip; it’s a delicate process that removes air and fills the pump with liquid before startup.
- Even if your motor’s running, trapped air, suction issues, or a bad valve can stop flow completely.
- This guide explains how priming works, why it fails, and how to catch problems before they damage your pump.
- You’ll learn how to identify poor priming, fix it fast, and design systems that don’t sabotage themselves.
What Is Pump Priming and Why Is It Necessary?
Priming is the process of removing air from a pump’s casing and suction line before startup and replacing it with liquid. For centrifugal pumps, this step is critical. These pumps rely on fluid contact to generate the suction force needed to draw liquid through the system.
If air remains in the system, the pump impeller spins uselessly in a vacuum, leading to dry running and, eventually, failure.
Unlike positive displacement pumps, centrifugal pumps don’t create suction on their own when empty. They need to be “primed”, filled before they can begin moving fluid effectively.
If the pump isn’t properly primed:
- No flow is generated despite the motor running.
- Overheating begins as internal components run dry.
- Seals and bearings wear down quickly, increasing maintenance frequency.
- Cavitation risks increase, leading to vibration, noise, and erosion.
This is especially true in applications with long suction lifts, irregular fluid supply, or systems that sit idle between uses. In such setups, improper priming can shorten pump life dramatically or even ruin a new installation before it starts working.
In short:
If there’s air where there should be liquid, the pump won’t work, and everything downstream suffers.
Types of Priming Methods: Manual vs. Automatic
The centrifugal pump priming process can be executed in different ways, and choosing the right one depends on your system design, fluid characteristics, and operational frequency.
Manual Priming
In manual priming, operators fill the pump casing and suction line with liquid before startup. It’s simple but prone to error, especially in large systems or when suction lines aren’t easily accessible.
When to use it:
- Systems with short suction lines
- Occasional-use pumps (e.g., standby units)
- Locations where automation isn’t feasible or cost-effective
Challenges:
- Time-consuming and operationally inconsistent
- Highly dependent on operator technique, increasing the risk of incomplete priming and trapped air, especially in systems with complex suction lines
- Risk of system damage if the priming step is rushed or skipped
To assist with manual priming, many setups include a foot valve at the suction end to retain fluid and prevent backflow after shutdown.
Automatic Priming
Automatic systems use vacuum pumps, priming tanks, or specially designed self-priming pumps to remove air without manual intervention. These systems are built for consistency and speed.
Common setups include:
- Vacuum-assisted priming: A vacuum pump draws air out of the suction line until liquid fills the system.
- Priming tanks with ejectors or float valves: These create a sealed, always-filled chamber to maintain readiness.
- Self-priming centrifugal pumps: Designed with special volutes or recirculation paths to re-prime after initial filling.
When to use it:
- Systems with long or elevated suction lifts
- Remote, automated, or continuous operation systems
- Applications requiring frequent start-stop cycles with minimal delay
Caution: While self-priming pumps offer convenience, they’re not a universal fix. Viscous fluids, thick slurries, or solids-heavy liquids can overwhelm their capabilities. In such cases, external vacuum systems or alternative pump types may be necessary.
Whether you’re relying on a manual fill or an automated vacuum system, the goal remains the same: get every last bit of air out before startup.
The next step? Understanding exactly how to do that, without missing a detail that could leave your pump spinning dry.
How to Prime a Centrifugal Pump: Step-by-Step Process
Whether your system uses manual priming or a built-in auto system, the goal remains the same: remove air before startup. Even a small air pocket can stall flow, trigger cavitation, or cause premature wear.
The following sequence shows how to prime a centrifugal pump correctly and why each step matters, regardless of how advanced your system is.
Even automated systems typically follow the same sequence, they just do it without manual input.
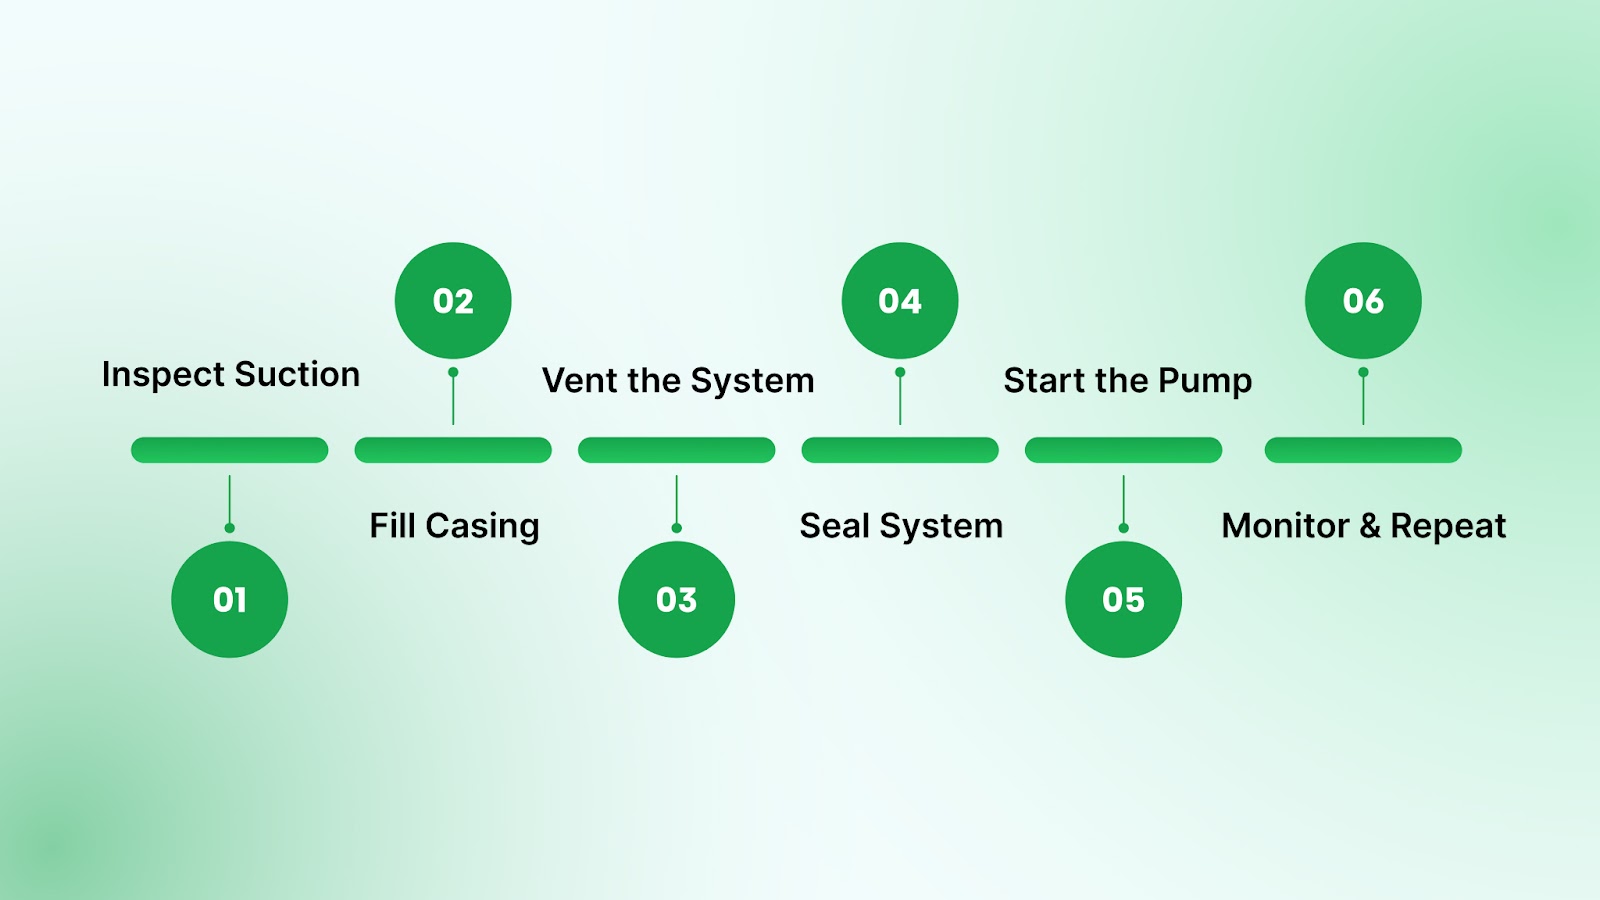
Step 1: Inspect the Suction Line
Before touching the pump, check the suction line:
- Ensure it’s airtight with no loose fittings, cracks, or visible wear.
- If there’s a foot valve, confirm it’s clean, functional, and free from blockages.
- For long vertical lifts, verify the suction height is within allowable limits to avoid vapor lock or dry pull.
A leaky or improperly placed suction line will sabotage the priming process, no matter how careful you are downstream.
Step 2: Fill the Pump Casing
Open the priming port (usually at the top of the casing) and begin filling the pump with liquid manually:
- Use clean process fluid or compatible water, not air or oil substitutes.
- Fill until the casing is completely full and air is visibly expelled through the open port.
- In setups with transparent hoses or sight glasses, confirm that fluid has reached the top of the casing without bubbles.
Don’t rush this; trapped air inside the casing is the most common cause of failed priming.
Step 3: Vent the System
Even after filling, small air pockets can linger:
- Gently tilt or rock the pump body if possible to dislodge hidden air.
- Open any manual air vents in the suction line to allow air to escape as liquid backfills the pipe.
- Some operators install temporary bleed lines to vent air until liquid discharge begins.
This step is often skipped, but it’s crucial if your suction line runs uphill or contains dips that collect air.
Step 4: Seal the System and Check Valves
Once the system is full:
- Close the priming port tightly.
- Confirm the discharge valve is partially closed. This reduces backpressure and eases startup.
- Double-check the foot valve (if used) to ensure it holds liquid when the pump is off.
A loose priming plug or valve that leaks under pressure will instantly pull air into the system again, undoing everything.
Step 5: Start the Pump
Now it’s time to energize the motor:
- Watch for pressure buildup at the discharge.
- Within seconds, liquid should begin to flow.
- If the pump runs but no pressure builds within 30 seconds, shut it down and recheck for air or suction issues.
Never “wait and see” when priming. Dry running causes seal damage and impeller wear in minutes.
Step 6: Monitor and Repeat if Necessary
Sometimes the first attempt doesn’t fully remove air:
- If the flow is inconsistent, repeat the venting and filling process.
- For systems that sit idle often, add non-return valves or priming tanks to reduce manual effort in the future.
Still not getting a consistent flow? Even after careful priming, some systems continue to show signs of trouble. That’s your cue to stop, observe, and troubleshoot.
How to Detect and Fix Centrifugal Pump Priming Issues
Even if you’ve followed every step, centrifugal pump priming can still go wrong. Here’s how to recognize the warning signs early and what to do before they spiral into costly damage.
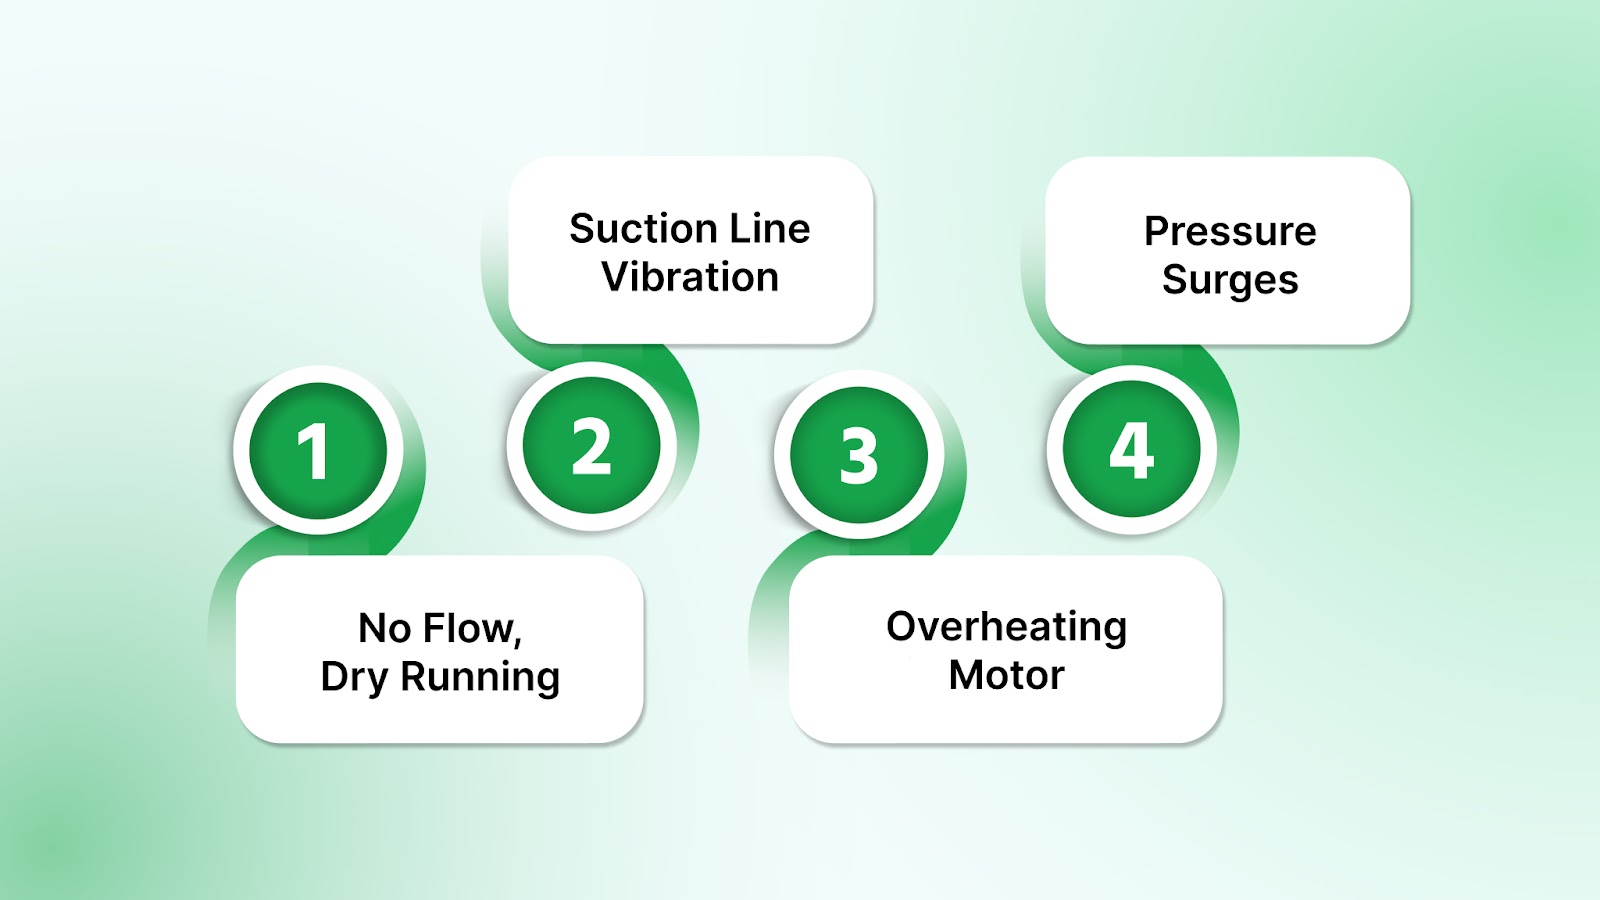
1. No Flow and a “Dry Running” Sound
- What it means: The pump is spinning, but no fluid is moving. You may hear a metallic hum or high-pitched whir; that’s your impeller running in the air.
- Likely cause: The system is air-bound. Either the pump casing wasn’t filled completely, or air is trapped in the suction line.
- Quick fix: Shut down immediately. Reprime the pump manually and double-check for missed venting steps. Confirm the foot valve is sealed and functional; even 60 seconds of dry running can damage seals or warp impellers.
2. Vibration in the Suction Line
- What it means: You feel pulsing or shaking along the suction pipe. Flow is inconsistent, likely broken up by trapped air bubbles.
- Likely cause: Air is leaking in through flange joints, loose fittings, or hairline cracks in the suction line.
- Quick fix: Perform a suction-side pressure test. Re-seal joints, inspect gaskets, and replace any compromised piping.
3. Overheating Motor
- What it means: The motor feels unusually hot to the touch, or it trips on thermal overload protection.
- Likely cause: The pump is running dry or cavitating. This can result from a clogged foot valve, insufficient Net Positive Suction Head Available (NPSHa), or poor suction design.
- Quick fix: Check for debris blocking the foot valve. Confirm the liquid level hasn’t dropped too low. You may need to reduce the suction lift or reposition the pump for better elevation.
4. Pressure Surges or Inconsistent Flow
- What it means: The pressure gauge bounces, the flow rate fluctuates, or you hear gulping or sloshing noises in the line.
- Likely cause: Incomplete air removal during priming or excessive suction lift, especially in systems drawing from open tanks or underground sources.
- Quick fix: Install or check air release valves at high points in the suction line. Reduce the vertical lift if possible, or relocate the suction tank to ease strain on the pump.
Still Facing Issues After Priming?
Even after a textbook priming process, some pumps still underperform. That’s because trapped air isn’t always the only culprit.
Hidden issues like:
- Micro-leaks at seals or flanges
- A worn-out impeller struggling to build pressure
- Poor suction line design, causing repeated air ingress
…can all sabotage performance without obvious warning signs.
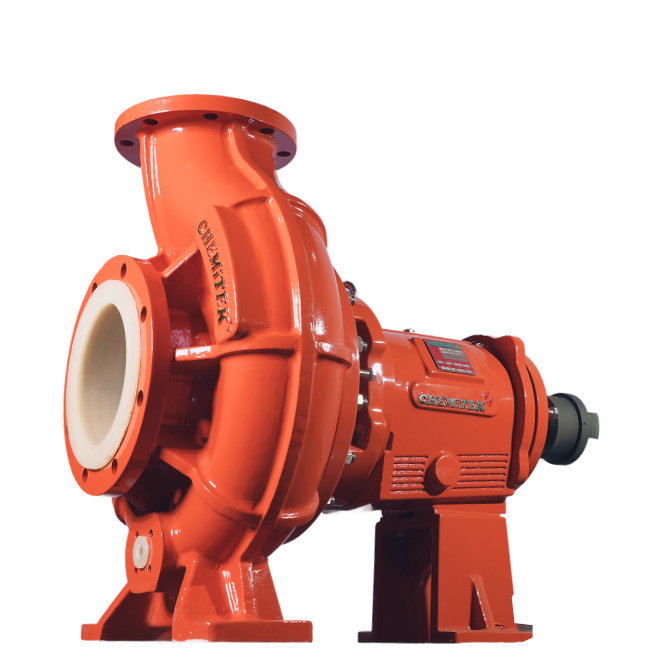
This is where a full system diagnostic matters. Chemitek’s pump specialists can review your installation end-to-end, not just the pump, but the pipe layout, NPSHa, valve placement, and operational logic to help you fix root causes, not just symptoms.
Get to the root of persistent priming problems. Talk to a Chemitek expert today.
Best Practices to Ensure Reliable Priming
Preventing priming failures isn’t just about what you do after the pump is installed it starts with good design habits and smart operational routines. These best practices help reduce the risk of air binding, dry starts, and premature wear:
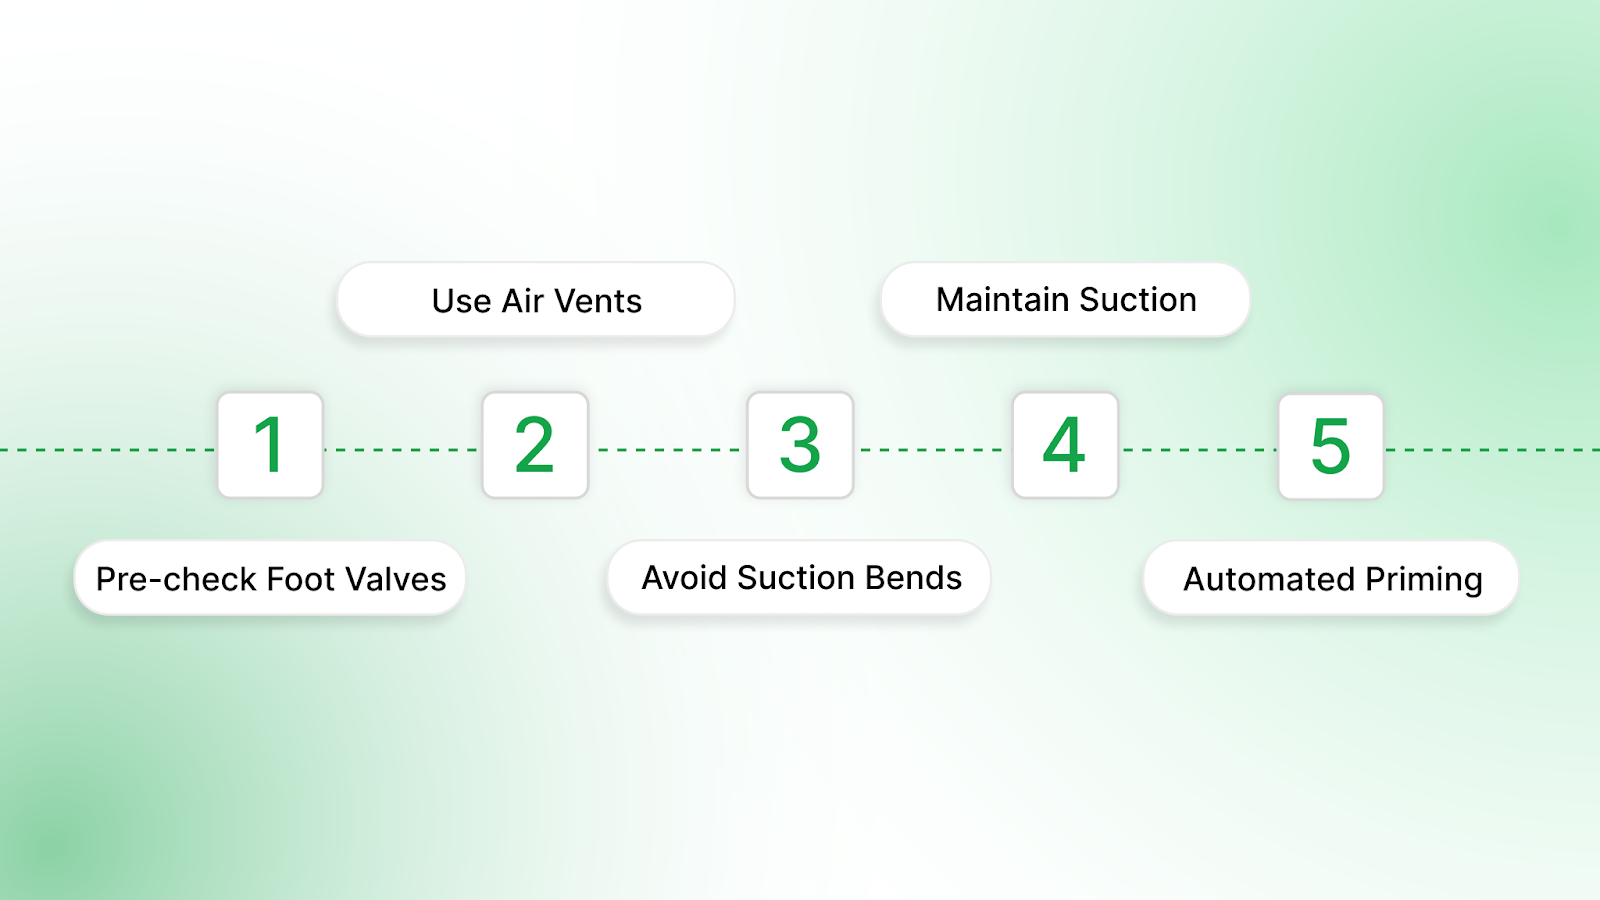
- Always pre-check foot valves
A leaking or stuck foot valve defeats the purpose of priming. Inspect for debris, misalignment, or backflow regularly, especially after prolonged shutdowns. - Use air vents or bleed valves
Manual or automatic air vents at high points in the suction line prevent air from collecting in dips or elbows, keeping the flow path consistently primed. - Avoid sharp suction bends
Every 90-degree elbow adds turbulence and becomes a trap for air pockets. Use long-radius bends or flexible hoses when possible to smooth the path. - Maintain a flooded suction
Whenever possible, position the pump below the liquid source. Gravity-fed suction lines eliminate the need for frequent priming and are far more stable over time. - Use automated priming in remote setups
Manual priming isn’t practical when pumps are installed in unmanned or hard-to-reach locations. Self-priming pumps or vacuum-assisted priming systems ensure reliable startups without operator presence.
These aren’t just checkboxes; they’re foundational choices that influence pump performance from day one.
Final Thoughts
Priming is often treated as a minor task, but its impact on pump reliability is anything but small. Without proper priming, even the most high-end centrifugal pump can fail within minutes and take critical systems down with it.
Designing for easier priming, using the right tools, and knowing what warning signs to look for can extend pump life, reduce energy waste, and avoid mid-process breakdowns.
If you’re still seeing inconsistent flow or startup issues, don’t assume it’s operator error. A second set of eyes on the system layout might be what’s needed.
Already worked through best practices and still seeing issues? It might not be a setup flaw; it could be a design gap. Before you re-prime again, take a second look at your full system design.
Frequently Asked Questions
1. Can a centrifugal pump self-prime on its own?
No. Standard centrifugal pumps aren’t self-priming. They require the casing and suction line to be completely filled with liquid before startup. Self-priming centrifugal pumps are available but must be selected and installed correctly for the fluid type and suction conditions.
2. How do I know if air is trapped in the suction line?
Common signs include a dry-running sound, pressure fluctuations, vibration in the suction pipe, or inconsistent flow. You may also hear sloshing or “gulping” noises. Use vent valves or pressure tests to confirm air pockets.
3. Why does my pump lose prime after every shutdown?
This usually points to a leaking foot valve, suction line air ingress, or an improperly sealed priming plug. It can also happen if your system isn’t designed to retain fluid between cycles, consider adding a check valve or priming tank.
4. Is manual priming enough for large or remote systems?
Not usually. Manual priming becomes unreliable in systems with long suction lines, high lifts, or remote locations. In these cases, vacuum-assisted systems or self-priming pumps offer safer, more consistent results.
5. How often should I inspect priming components like foot valves or vents?
At a minimum, inspect these components during every scheduled maintenance cycle or after any shutdown longer than 24–48 hours. In slurry or solids-heavy systems, more frequent checks are recommended due to debris buildup.
6. How does priming change when handling hot liquids?
Hot liquids can flash into vapor during priming, leading to vapor lock or air binding. To avoid this, use a flooded suction, keep suction lines short, and consider vacuum-assisted priming systems to remove vapors before startup.
Latest posts
Ready to Upgrade Your Process Operations?